It’s always comforting to get transplants and seedlings from greenhouses. They always look so robust and healthy. Halfway through spring you waltz through the greenhouse picking up all your powerhouse seedlings and plants. Some years, before you know it, BAM! 100$ disappears. For some varieties of tomatoes you always feel so impressed with the variety of options of transplants! And cucumbers? Well, there’s a couple there so who cares?
Turns out seed catalogues and companies have a lot more options. A Canadian company called the “Heritage Seed Company” has a ridiculously huge number of tomato breeds (I’m guessing over 100) with all manner of description. Generally, seed options give you a LOT of different possibilities. Another example: I was looking for a short pea plant because I didn’t have my normal pea fences. All the local seed shops carried the same 3 vining peas that were all over 6ft. From a seed company I found one 4 ft. Perfect.
I’m telling you now it is SO worth it to start seeds in doors, even with the questions you have surrounding it. I hope to answer the biggest concerns you may have.
Equipment
So right off let me just say this: Grow lights are great but not totally necessary. If you DO have an inkling to build a simple grow light, I made a blog when I built mine. You can read about it here. Total cost was about 55$ I think.
Necessary stuff:
- Soil. Anything that says is “good for transplants” will do the job. You don’t need anything fancy. If you want to start with very strong plants, get a bag of compost, manure or fish soil (if you want the real goods!) and mix that in with your soil….at maybe a 4:1 ratio (soil:additive). Don’t be specific though; just approximate. Too much of the additive will not be a problem.
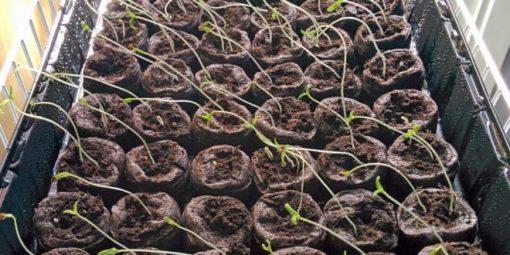
- Planting pots. Some garden stores have recycling programs. Those are great…BUT, and this is important, you need to sterilize or at LEAST give them a good clean. Common pests and diseases can get transferred by used pots. “Damping off” is a common problem with seedlings that can happen with used pots. We’ll talk about that later. But either buy new pots or clean out recycled ones. In my 10 years of gardening, I’ve bought about 20 pots. Between those, recycled ones, and pots that come with transplants I’ve bought, I’ve always had enough.
- Seeds. Duh. Yes you need seeds. Which seeds? We’ll get to those later. Especially for plants that you can start right now!
- Trowel, Bucket, Workstation. If you get a soil additive it’s good to have a bucket to mix it in. And have a place that you are okay to get a bit dirty.
Considerations & Tips
Seeding:
Fill the soil to about 1cm from the top of your container and press the soil down. Place your seeds on top of your compressed soil and then add soil on top of that, thick enough to mimic the planting depth suggest on the package (usually about .5-1cm) It is a HUGE benefit to have your plant pots sitting in a water holding tray (ie…no holes!)
Tip 1: NEVER plant only one seed per cell/post. I like to use about 3 or 4 in each container. When the time comes, you’re going to cut down all but the strongest. Don’t feel bad; just pretend they hate you and tell rumours about you.
Temperature:
Small seedlings do NOT benefit from warmth. NO no no! The ideal temperature for seedlings would be a steady 12-16C degrees for most veggies. What the small seedlings DO need is light; either from a growlight OR the sun (keeping in mind the sun will likely make things hot). THIS is what gets them going (and, of course, proper watering).
Like humans though, plants grow strongest and most resilient when they are given their own little “struggles” to get through, so long as they have the things they need to survive. I have lost MANY seedlings and seeds due to weak, leggy growth. They look like this:
So tall and sad. It is possible to avoid this
Tip 1: A light wind or breeze and cooler temperatures will get you strong strong plants. If you go out to greenhouses now, you’ll see these tiny seedlings inside the greenhouse; and these greenhouses nowadays are not tropical at all. The temperature and breeze cause the plants to grow a nice, thick, solid main stem which can keep it from getting too “leggy” or tall. I have a small dollar store
fan that blows along (and over) all my seedling trays; it should not be a strong wind and it doesn’t need to be direct…just something that keeps plants moving now and then.
Tip 2: (if you can control the light): Until the plants actually sprout up, you can have 24hr lights (though I prefer about 16hrs on). Once the plants are up, they do need some dark time as that time encourages other necessary biological process. Generally, I’ll do about 14hrs on, a day. As you get closer to putting them in the garden, you’ll want to shorten the time under a light though to be closer to matching what they would get once you leave them out. Later in the spring, we’ll discuss good transplanting strategies.
Watering:
Watering is another thing I’ve had trouble with, strangely. After you’ve potted your seeds and been sure to compress your soil down you’ll give your plant a good solid watering. You want the seed pot to be much heavy (a sign it’s holding that water). Also make sure the top of the soil is damp. I also have a spray bottle that comes in VERY handy during the tiny seedling stages and maybe even before you see plants. Seeds sprout when there is enough water for them to break their outer protective layers. Keeping a moist surface REALLY helps in keep the seed moist and I’ve found spray bottles were the best and gentlest way to accomplish that. In fact, I found surface watering of those pots to be really counter productive at times. My “tip” comes into play with all other waterings except the first one and really is most important when plants are a bit bigger.
Tip 1: Do ALL your other watering by putting the water into the tray that your plants are sitting in. Fill the tray so there’s maybe about 2cm of water in the tray (if your tray is filled with plants). Allow the water to be all sucked up. Then wait a couple to a few days. This is the only time of concern. You don’t want (or need) to refill the whole tray with water again right after it empties (this will drown the seedlings) but you will need to refill it in “x” number of days. To find “x”, monitor each plant’s moisture level by weight.The best reason for watching with this method is that it keeps thin little stems from being drowned or washed out.
Types of Plants:
First off, some plants to never bother starting indoors. Either because they don’t like it, they don’t like being transplanted, or they simply do better with seeds directly in the garden.
Don’t seed inside: Carrots, beets, beans, cucumbers (unless they are in pots that can go STRAIGHT into the garden without removing them), melons,or peas. Even some of these you could start as transplant, but really, there are enough options of plants that do WAY better to be transplanted, focus your effort on that.
As of writing today, March 28th, you could be starting some seeds indoors. In fact, I’ve noticed that many flowering seeds need to be in transplant pots more than a month ago (not many but some). Generally, I tend to speak just about vegetables on this post. Flower seeds are of such variety of requirement all I can suggest is that you read the planting package carefully and follow those to a TEE!
For vegetables you could have already started OR that you should be starting right away:
Tomatoes/Peppers: Could be started already, certainly can be started now, but the sooner the better. It is strongly recommended against planting tomato seeds directly into the garden. Tomatoes need to grow a decent root structure before they get out into the garden where the soil needs to get to a certain temperature. Starting seeds indoors will get you a bigger plant sooner (which will get you more fruit sooner and, then by extension, more fruit). Peppers tend to have very similar needs to tomatoes so just “ditto” all the tomato stuff I said..
Onions Leeks: Most people buy those onion “sets”. They look a bit like a bulb of garlic but they are actually a very underdeveloped onion. When you plant it back in the ground it starts to grow but, and it’s important: You do NOT plant those inside. THose are only for direct seeding into the garden. If you do try growing onion seeds (which can be fun) they need to be started now at the latest; they have a VERY long growing season (leaks also). Remember though: if you decide to go with the onion sets (no options for leaks for this, by the way), plant those directly in the garden sometime around May long.
Lettuce: Lettuce is a bit of a tough nut in the garden. Start these transplants right away and be ready to plant them out into the garden in the first or second week of May. I strongly recommend “staggering” your lettuce plants (every couple weeks, start 4 or 5 new plants). It’s lame having 12 lettuce heads be ready to go all at the same time. ALL that consideration has to happen now.
Vegetables you can start in the middle or end of April:
Cucumbers: Cucumber roots are delicate little things. Too much disruption while transplanting and it’ll kill the plant. Instead, what we need to do with Cucumbers is put them into “Coir” or manure pots. These are kinds of pots that, at transplanting time, you soak for about 5 minutes and then just put the whole sloppy mess into your transplant hole; pot and all. More specific detail on transplanting later in May, but remember that Cucumbers make great transplants IF you grow them in the right pot; otherwise, forget it.
Zucchinis and Squashes: These plants really like warmth. Starting them a tad later means that when you they are ready to be transplanted out, the soil will be warmer and the airs will be warmer too.
Broccoli: Starting mid April would be perfect for these veggies. I love growing garden broccoli, it has such an intense flavour. I just wish I had a bit more success by harvest time (a tale for another time).
The weather just seems hell bent on staying a bit cooler than necessary to start the daydreaming of gardening. Another skiff of snow today had me delay my hopes even a bit more. It sounds like next weekend it’s warming up. I’ll take some pictures and talk about gardening clean up; how to do what, when and where.

Leave a comment